WaveForge / StabilityCore · transport · installed 2026-09-18–21
Class III Hitch — Field Engineering Log
Four days under a Honda CR-V, alone, in a driveway. The hitch is not the project — it is what moves the project.
What the installation videos leave out
A consumer accessory kit meets a chassis it was never fitted to in person. The bolt pattern is right; everything around the bolt pattern is the problem — blind frame rails with no line of sight, a tailgate sensor the instructions do not mention, tool swing measured in millimetres, and hardware that falls into holes it cannot be retrieved from.
Five of those took real work to get past. What follows is what the constraint actually was, why the documentation was no help, and what got through it.
Hardware, and the number that actually governs
| Part | Spec | Note |
|---|---|---|
| CURT 13397 Class 3 hitch, 2 in receiver | 3,500 lb GTW · 525 lb TW | Fits 2017–2026 CR-V. Maker states “Fascia and Undercar Trim Required” and “May Affect Hands-Free Liftgate.” |
| 56370 4-way wiring harness | Plug & play, pure copper | ⚠️ “Factory Tow Package Required” — and this car does not have it. The harness was unusable as sold, which is why the wiring became a custom splice job. |
01 · Endoscopic retrieval, and breaking a magnet’s shear bond
The constraint. A 7/16 in carriage bolt slipped its spring tether and dropped into a blind horizontal frame channel — no line of sight, no access from either end. The obvious fix made it worse: a magnetic pickup went in, contacted the carbon steel wall broadside, and locked flat. Now there were two objects stuck in the rail.
Why the manual doesn’t help. The manual assumes the bolt does not fall. There is no retrieval procedure because there is no acknowledged failure mode.
What worked. Two problems, two tools. A magnet sitting flat on steel is enormously strong in tension but weak in shear — so a concave tape-measure blade was snaked down the rail and used to slide it sideways off the wall rather than pull it off. Then the retrieval itself: a 5 mm inspection endoscope is too limp to steer, so heavy-gauge copper wire was coiled tightly down its length to give it a rigid spine. With the camera now aimable rather than merely pushable, the bolt could be seen and swept out.
02 · Bumper deflection instead of bumper removal
The constraint. The main cross-tube could not rise into position. The obstruction was the housing clips for the hands-free tailgate kick sensor — a subsystem that did not exist when the hitch was designed.
What the maker says. ⚠️ Correction, 2026-09-23: CURT does flag this — the 13397 listing states “Fascia and Undercar Trim Required” and “May Affect Hands-Free Liftgate.” So the procedure calls for removing the painted rear fascia entirely: dozens of clips that break, a painted panel to store and re-hang, and a live sensor harness to disturb — a large risk to solve a two-inch clearance problem. Beating that stated procedure is the achievement here, which is a stronger claim than the maker having overlooked it.
What worked. Released only three lower perimeter fasteners near the central tow loop and flexed the lower polypropylene lip back about two inches. That opened a temporary gap just large enough to scoop the cross-tube forward into its pocket. The painted upper fascia never moved and the sensor harness was never touched.
03 · Matching the jig’s pitch to the chassis
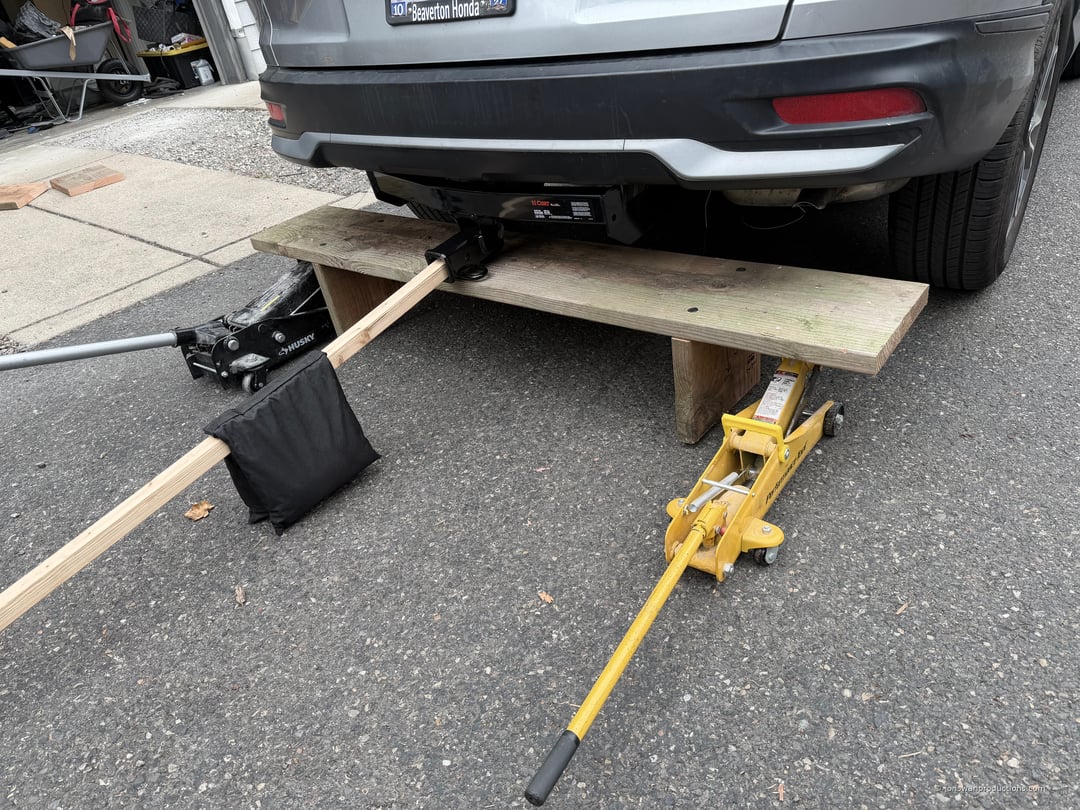
The constraint. With the rear on jack stands, the car sits nose-down. A floor jack and a flat platform lift the hitch level — so the mounting slots met the frame bolts at an angle and cross-jammed, binding a millimetre at a time along their length.
Why the manual doesn’t help. Every instruction diagram is drawn with the vehicle level. Nothing addresses the geometry of a car on stands, which is how nearly every driveway install actually happens.
What worked. A wooden shim under the rear of the rolling platform jig, near the 2 in receiver opening, pitched the hitch forward until it was parallel to the sloped frame. Once both were on the same plane the slots dropped straight over the hardware with no binding at all.
04 · Gorilla tape as a fastener retainer
The constraint. The frame bolts have to sit in position while a heavy steel plate is offered up to them. The kit’s pull wire and spring block get a bolt into the rail, but keeping it exactly where you want it while both your hands are holding a hitch is a different problem — contact nudges it and it moves out of alignment, or worse, gets away from you entirely. ⚠️ That is precisely how the bolt in Protocol 01 ended up loose inside the rail.
What worked. Gorilla tape. Strong enough to hold a bolt firmly in place, thin and conformable enough not to interfere with seating, and it simply gets destroyed by the flange nut on final torque — which is exactly what a temporary retainer should do.
⚠️ Correction, 2026-09-23: an earlier version of this page described “cardboard friction studs” modelled on closet-flange toilet bolts. That did not happen — it came from an AI draft of this write-up, not from the install, and it contradicted Protocol 01’s spring tether. Recorded here rather than quietly deleted, because a build log that silently edits itself is worth nothing.
05 · Moving the exhaust to make room for a wrench
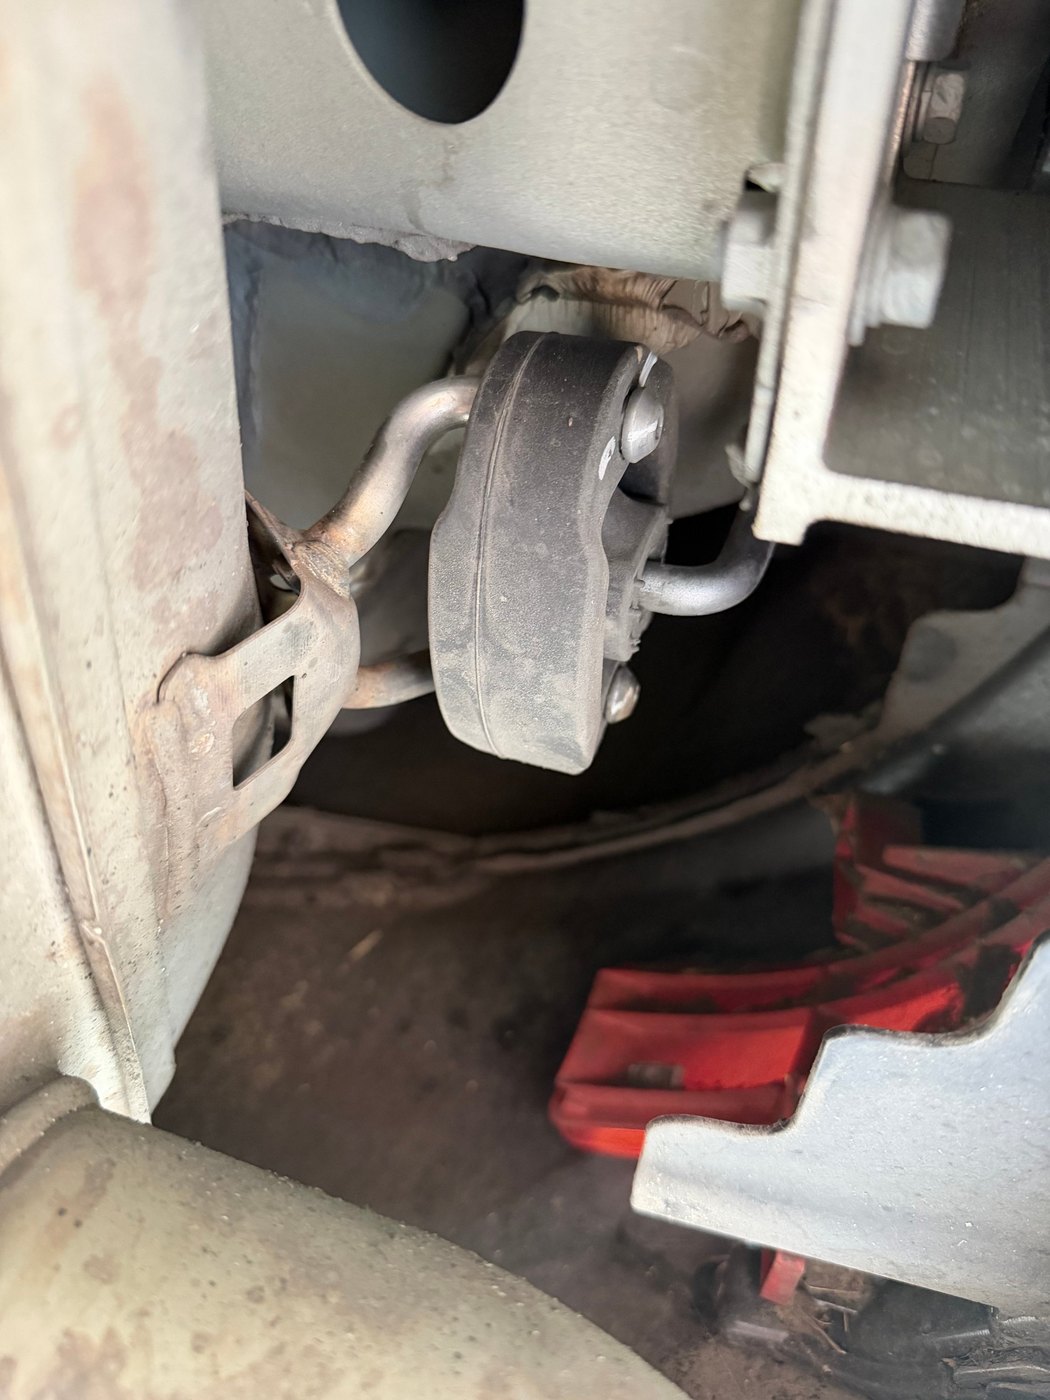
The constraint. The driver-side muffler left under two inches of side clearance at the rearmost fastener — not enough swing for a click-type torque wrench, and a fastener you cannot torque properly is a fastener you have not installed.
Why the manual doesn’t help. Torque specs are given with no discussion of whether a wrench physically fits. The clearance problem is treated as though it does not exist.
What worked. A 2x6 timber block wedged into the exhaust pocket, loading the muffler body evenly and stretching the rear rubber isolator loops enough to hold the whole assembly clear of the work area. That opened a straight-line path for a slim digital torque wrench. The deliberate cost: the forward rubber isolator was cut — not torn by accident, but sacrificed on purpose to let the muffler drop far enough. A $5 part traded for the clearance to torque a fastener properly, which is the right trade: a fastener you cannot reach with a torque wrench is a fastener you have not really installed. Bridged with a full steel pipe clamp until the replacement goes on.
Torque record
| Node | Spec | Status |
|---|---|---|
| Primary subframe anchors ×4 | 59 ft-lb · 17 mm | ✅ At spec with a calibrated wrench. Serrated flange teeth crushed through the cardboard retainers and seated flat to the chassis. |
| Center tow loop anchor | 110 ft-lb · 1/2 in carriage bolt | ⚠️ OPEN. Load-bearing bridge washer fitted; reached roughly 80–90 ft-lb by hand, short of the 110 spec. Booked for a shop hoist. |
| Hands-free kick sensor | Factory clearance | ✅ Inspected and dynamically tested. Automatic tailgate tracking normal. |
| Forward exhaust hanger | OEM rubber isolator | ⚠️ OPEN — closing 2026-09-24. Cut deliberately for clearance; full steel pipe clamp fitted as a temporary hold (strong, but rigid — see note below). Replacement hanger in hand. |
| Rear exhaust hanger & center support | — | ✅ Intact and carrying the load, which is why the torn forward hanger is not urgent. |
- The tow loop anchor is under spec — 80–90 ft-lb against 110. That bolt is a primary load path for tongue weight. Calibrated wrench, to spec, before anything goes on the ball.
- The exhaust hanger is a rigid steel clamp. To be precise about the concern: the clamp itself is not the weak point — a full metal pipe clamp will outlast the car. The issue is that it is rigid. Rubber is there because an exhaust system grows an inch or more when hot, and with one mount now immovable that expansion loads the remaining hangers and the flex joint instead. The clamp survives; something else takes the strain. Short local trips only. ✅ Replacement hanger being fitted 2026-09-24 — a $5 part, and the rear hanger plus center support are carrying the weight meanwhile.
The pattern underneath all five
Every one of these was the same shape of problem: the kit is dimensionally correct and contextually blind. The holes line up. What the designers could not know is that this car has a kick sensor in the way, that the muffler is two inches from the last nut, that a driveway car sits nose-down, and that a dropped bolt in a sealed rail is unrecoverable with any tool in the box.
Which is also the argument for documenting it. The bolt pattern is in the instructions. None of the five fixes above are — and they took four days, where the bolting took about an hour.
What it unlocks
- The shake table reaches a venue — OMSI, a university bench, a demo in front of people who cannot come to the garage.
- The buoy demonstrator reaches real water. Every ledger row that currently reads in the pool gets a field version, with real swell and real wavelengths — which matters enormously given the frame-diameter-to-wavelength scaling trap on that machine.
- The research vessel reaches a ramp, which turns river current and wave height from assumptions in a model into numbers in the ledger.
The trailer was bought before there was anything to put on it, and the hitch before the trailer arrived. That turned out to be the right order — the same way the parts for the demonstrator were accumulated before the machine existed.
Private build log · WaveForge / StabilityCore · 2026-09-18–21